- Return to book
- Review this book
- About the author
- 介紹
- 1. 網際網路(Internet)是如何運作的?
- 2. 命令行(command-line)簡介
- 3. 安裝 Python
- 4. 初試 Python
- 5. 什麼是 Django?
- 6. 安裝 Django
- 7. 程式碼編輯器
- 8. 開始一個 Django 專案
- 9. Django models
- 10. Django ORM (Querysets)
- 11. Django admin
- 12. Deploy!
- 13. Django urls
- 14. Django views - time to create!
- 15. Introduction to HTML
- 16. Dynamic data in templates
- 17. Django templates
- 18. CSS - make it pretty
- 19. Template extending
- 20. Extend your application
- 21. Django Forms
- 22. Domain
- 23. What's next?
Extend your application
We've already completed all the different steps necessary for the creation of our website: we know how to write a model, url, view and template. We also know how to make our website pretty.
Time to practice!
The first thing we need in our blog is, obviously, a page to display one post, right?
We already have a Post model, so we don't need to add anything to models.py.
Create a link in the template
We will start with adding a link inside blog/templates/blog/post_list.html file. So far it should look like:
{% extends 'blog/base.html' %}

{% block content %}
    {% for post in posts %}
        <div class="post">
            <p>published: {{ post.published_date }}</p>
            <h1><a href="">{{ post.title }}</a></h1>
            <p>{{ post.text }}</p>
        </div>
    {% endfor %}
{% endblock content %}
We want to have a link to a post detail page on the post's title. Let's change <h1><a href="">{{ post.title }}</a></h1> into a link:
<h1><a href="{% url 'blog.views.post_detail' pk=post.pk %}">{{ post.title }}</a></h1>
Time to explain the mysterious {% url 'blog.views.post_detail' pk=post.pk %}. As you suspect {% %} notation means that we are using Django template tags. This time we will use one that will create a URL for us!
blog.views.post_detail is a path to a post_detail view we want to create. Please note: blog is the name of our application (the directory blog), views is from the name of the views.py file and the last bit: post_detail is the name of the view.
Now when we go to:
http://127.0.0.1:8000/
we will have an error (as suspected, since we don't have a URL or a view for post_detail). It will look like this:
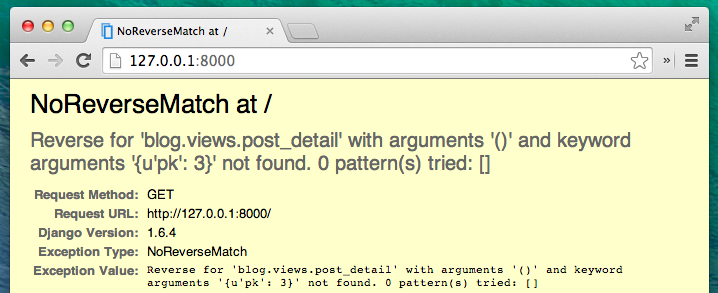
Let's create a URL in urls.py for our post_detail view!
URL: http://127.0.0.1:8000/post/1/
We want to create a URL to point Django to a view called post_detail, that will show an entire blog post. Add the line url(r'^post/(?P<pk>[0-9]+)/$', views.post_detail), to the blog/urls.py file. It should look like this:
from django.conf.urls import patterns, include, url
from . import views

urlpatterns = patterns('',
    url(r'^$', views.post_list),
    url(r'^post/(?P<pk>[0-9]+)/$', views.post_detail),
)
That one looks scary, but no worries - we will explain it for you:
- it's starts with
^again -- "the beginning" post/only means that after the beginning, the URL should contain the word post and /. So far so good.(?P<pk>[0-9]+)- this part is trickier. It means that Django will take everything that you'll place here and transfer it to a view as a variable calledpk.[0-9]also tells us that it can only be a number, not a letter (so everything between 0 and 9).+means that there needs to be one or more digits there. So something likehttp://127.0.0.1:8000/post//is not valid, buthttp://127.0.0.1:8000/post/1234567890/is perfectly ok!/- then we need / again$- "the end"!
That means if you enter http://127.0.0.1:8000/post/5/ into your browser, Django will understand that you are looking for a view called post_detail and transfer the information that pk equals 5 to that view.
pk is shortcut for primary key. This name is often used in many Django projects. But you can name your variable as you like (remember: lowercase and _ instead of whitespaces!). For example instead of (?P<pk>[0-9]+) we could have variable post_id, so this bit would look like: (?P<post_id>[0-9]+).
Ok! Let's refresh the page:
http://127.0.0.1:8000/
Boom! Yet another error! As expected!

Do you remember what the next step is? Of course: adding a view!
post_detail view
This time our view is given an extra parameter pk. Our view needs to catch it, right? So we will define our function as def post_detail(request, pk):. Note that we need to use exactly the same name as the one we specified in urls (pk). Omitting this variable is incorrect and will result in an error!
Now, we want to get one and only one blog post. To do this we can use querysets like this:
Post.objects.get(pk=pk)
But this code has a problem. If there is no Post with given primary key (pk) we will have a super ugly error!
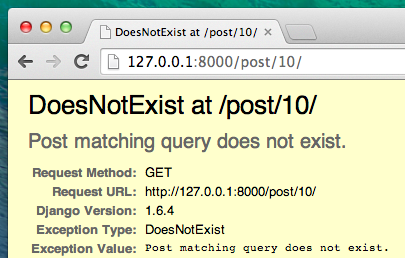
We don't want that! But, of course, Django comes with something that will handle that for us: get_object_or_404. In case there is no Post with the given pk it will display much nicer page (called Page Not Found 404 page).
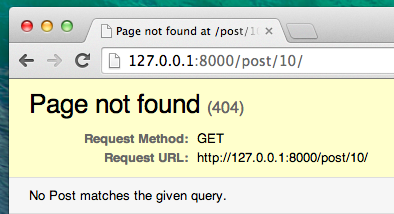
The good news is that you can actually create your own Page not found page and make it as pretty as you want. But it's not super important right now, so we will skip it.
Ok, time to add a view to our views.py file!
We should open blog/views.py and add the following code:
from django.shortcuts import render, get_object_or_404
Near other from lines. And at the end of the file we will add our view:
def post_detail(request, pk):
    post = get_object_or_404(Post, pk=pk)
    return render(request, 'blog/post_detail.html', {'post': post})
Yes. It is time to refresh the page:
http://127.0.0.1:8000/
It worked! But what happens when you click a link in blog post title?

Oh no! Another error! But we already know how to deal with it, right? We need to add a template!
We will create a file in blog/templates/blog called post_detail.html.
It will look like this:
{% extends 'blog/base.html' %}

{% block content %}
    <div class="date">
        {% if post.published_date %}
            {{ post.published_date }}
        {% endif %}
    </div>
    <h1>{{ post.title }}</h1>
    <p>{{ post.text }}</p>
{% endblock %}
Once again we are extending base.html. In the content block we want to display a post's published_date (if it exists), title and text. But we should discuss some important things, right?
{% if ... %} ... {% endif %} is a template tag we can use when we want to check something (remember if ... else .. from Introduction to Python chapter?). In this scenario we want to check if a post's published_date is not empty.
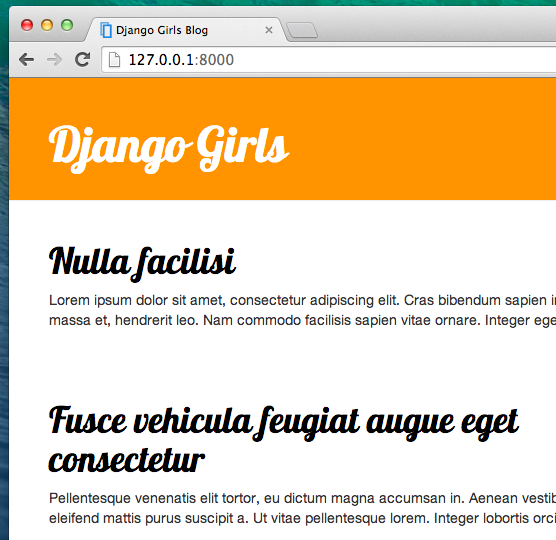
Ok, we can refresh our page and see if Page not found is gone now.
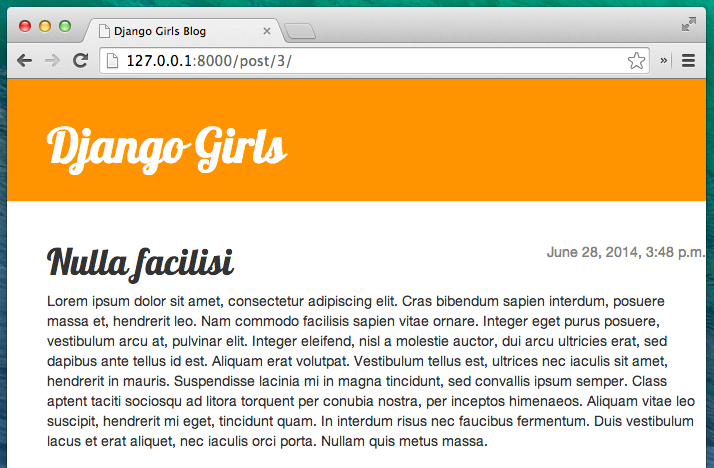
Yay! It works!
One more thing: deploy time!
It'd be good to see if your website will be still working on Heroku, right? Let's try deploying again. Open up your console and type this:
heroku push --app djangogirlsblog
: Remember to replace
djangogirlsblogwith the name of your application on Heroku.
And that should be it! Congrats :)